# Login Process User Guide
# Introduction
To access FundMaster on your device, launch your preferred internet browser and input the web Internet Protocol address provided by your system administrator as shown below:

After inputting the access IP address, a user is directed to the login page where one is supposed to enter login credentials for authentication.
Note: to successfully access the login page, the IP address must be correct and the local area connection stable. The following is a screenshot of the login page:
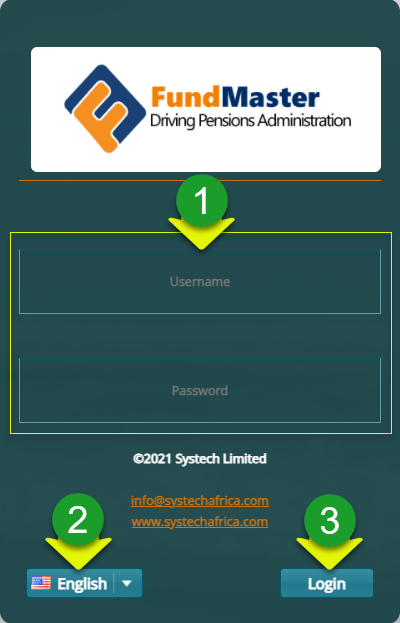
Action
Type Username and Password respectively in text boxes labelled 1.
Click and select a preferred access language from the drop-down menu labelled 2.
Click the login button labelled 3 to log in to the system.
Tip
- The system is set to allow a user only three attempts at log in after which the account is locked. The locked account can only be reactivated by the system administrator.
# Landing Page
This is the dashboard (with the main menu and other controls) seen on a user’s screen when one successfully logs in to FundMaster. See the screenshot below:
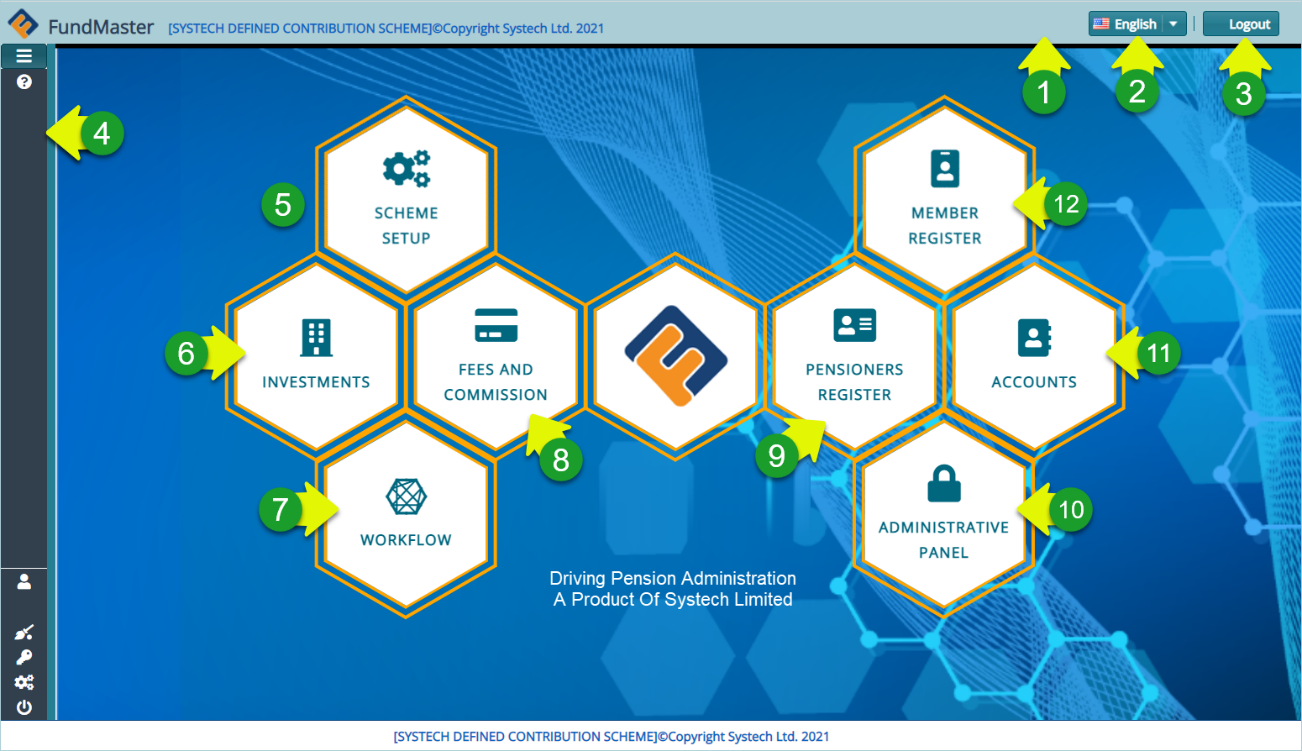
The circled numbers in the screenshot above correspond to the numbers in the following table that describe the key navigation clickable elements on the FundMaster landing page:
| No. | Interface Elements | Description |
|---|---|---|
| 1. | Top menu bar | This is the bar where the system version trademark, the name of the running scheme, language drop-down menu, and logout button is located. |
| 2. | Language drop-down menu | Click to select a language of choice. This will render the navigation and content in the selected language. |
| 3. | Logout button | Clicking this button will terminate all the running processes and close the system. |
| 4. | Main menu bar | This is the location of the major menu. Click to expand and display more menu items. |
| 5. | Scheme Setup link | A shortcut to launching the scheme setup module. Click to open the setup page. |
| 6. | Investments link | A link to the Investments Module. |
| 7. | Workflow link | A link to the Workflow Module. |
| 8. | Fees and Commission link | A link to the Fees and Commission Module. |
| 9. | Pensioners Register link | A link to the Pensioners Register Module. |
| 10. | Administrative Panel link | A link to the Administrative Panel Module. |
| 11. | Accounts link | A link to the Accounts Module. |
| 12. | Member Register link | A shortcut to the Members Register Module. |
# Main Menu Bar
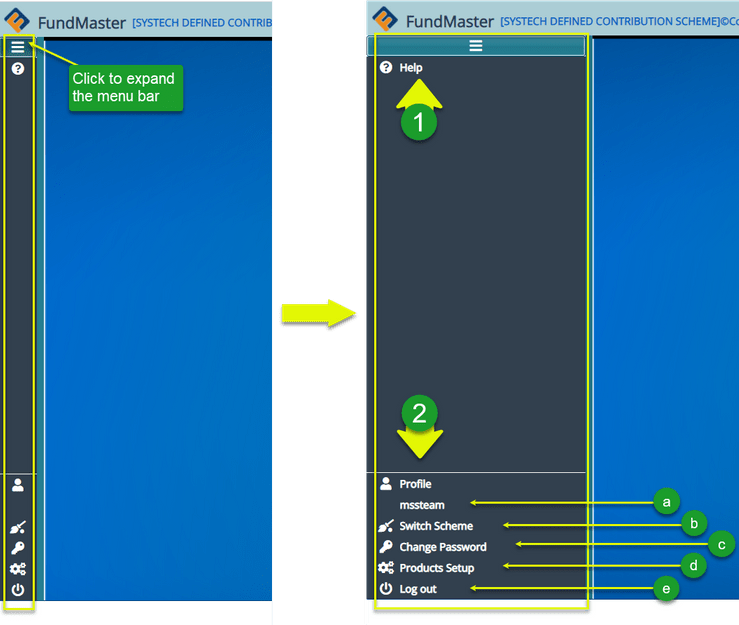
Clicking the hamburger icon on the upper-left corner of the landing page will enable a user to expand the menu bar, allowing access to more controls. The expanded menu bar displays a help tab, on the uppermost side, for accessing the help documentation.
Located on the lowermost side of the menu bar are more controls that enable other configurations for a user account. See screenshot below:
| No. | Element | Description |
|---|---|---|
| 1. | Help link | A link to the help documentation for user reference. Click to open the page. |
| 2. | Account config | A section with links for configuring user account details. |
| 2(a). | Profile | This is where the logged in user's profile name is displayed. |
| 2(b). | Switch Scheme | Allows a user to change from the currently running scheme to another without terminating a session. Note that a successful switch will change the scheme name on the uppermost bar |
| 2(c). | Change Password | Allows a user to change password for security reasons. |
| 2(d). | Products Setup | Clicking on this link will open the products page to view available products and create new. |
| 2(e). | Logout | Click to terminate all the running processes and close the current profile account ready to log in as a new user. |