# Approving a Scheme
After a scheme is created, the next step is to approve it by first providing a checklist for necessary documents and then approving the scheme. From the Setup Links left side panel, click the appropriate link as shown below:

# Scheme Documents Checklist
Click the Scheme Documents Checklist link to open the window through which the management of such document is done as shown below:

Action
Click label 1 button to create a new document checklist.
Click label 2 button to view details of a selected document from the list.
Click label 3 button to delete a selected document item from the list.
# Scheme Approval
Clink the Scheme Approval link to open the window through which the verification and certification of the scheme is done among other actions as shown below:

Action
Click label 1 button to validate checklist of a selected scheme from the list.
Click label 2 button to open a drop-down list to certify and approve a selected scheme.
Click label 3 button to initiate the scheme cloning process. This allows the adoption of configurations from another scheme.
Click label 4 search box to search and filter a scheme from the list by name.
Click label 5 search box to filter schemes from the list as approved or not approved.
Click label 6 button to initiate risk assessment process for a selected scheme.
Click label 7 button and select a process from the drop-down list to view a report in print format.
Clicking the Checklist Validation button will open a Schemes Document Approval dialog box where documents can be searched from the list, received, and downloaded as shown below:
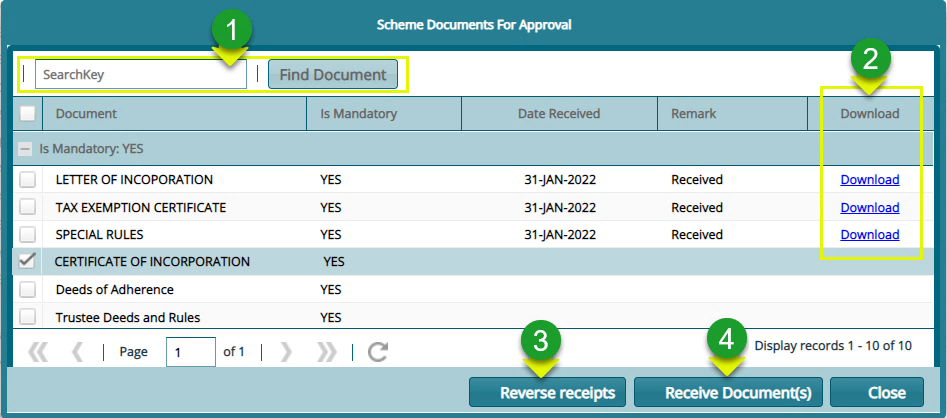
Action
Click label 1 button to type a key word to search for a document from the list.
Click label 2 text links to download a document that has already been received.
Click label 3 button to reverse a received document.
Click label 4 button to upload a document into the system.
Clicking the Receive Documents(s) button will allow a user to upload a file from his/her device through the dialog box shown below:

# Switching Scheme
After successfully approving a newly created scheme, one can go ahead and make it the Working Scheme. This is done by switching from the current scheme to the new scheme. This will allow a scheme administrator to continue setting up other configurations for the new scheme.
To switch schemes, first navigate back to the Admin Panel links window and click Existing Users as shown in the following screenshot:

Clicking the Admin Panels links will open the Existing Users window displaying a grid table listing all system users. Select the current user in the table and click the Details button as shown below:

Clicking the Details button will open the User Details window which shows Allowed Schemes, Sponsors and MemberClasses. Click the appropriate link to perform the specific action as shown in the screenshot below:
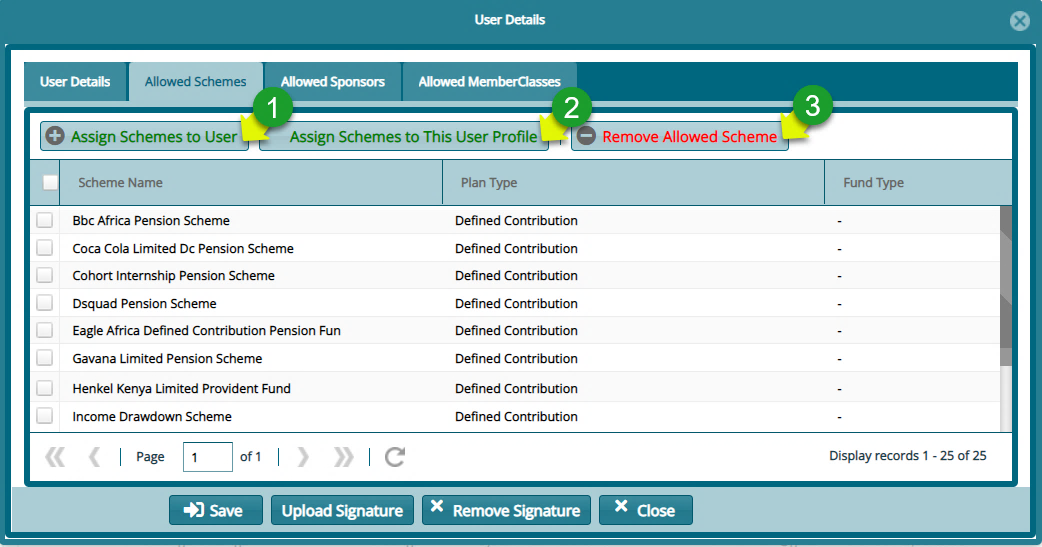
Action
Click button labelled 1 to open a window listing all available schemes from which new schemes can be selected and added to a user’s Allowed Schemes.
Click button labelled 2 to open a window listing all available schemes from which new schemes can be added to the profile category that this user belongs to.
Click button labelled 3 to remove a select record from a user’s assigned schemes.
Clicking the Assign Schemes to User button will open another window from which slected or all Scheme can be allowed for a user account as shown below:

Action
Click the checkboxes to select the Schemes to be allowed for the user. Then
Click the button on the upper right side of the window to display a drop-down menu. Then
Click the Allow Selected Schemes button to commit the changes.
Otherwise, if the user needs access to all available schemes, then select the Allow All Schemes in the drop-down list as shown above.
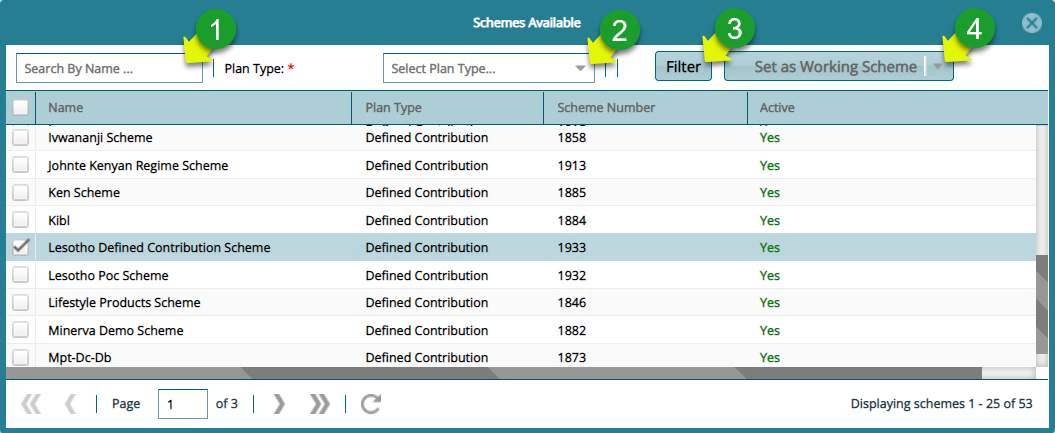
Find a Scheme quickly from the list by typing a name on the Search By Name box; select the Plan Type from the drop down menu and click the Filter button.
Tip
- The process of switching from a default scheme to a new scheme involves first navigating to the Existing Users window in the Admin Panel module and adding the newly created scheme from the list of Allowed Schemes.
# Switch Over
After assigning the new scheme to the current user account, navigate to the landing page and on the left side panel, click the Switch Scheme button as shown below:

Clicking this button will open a new window displaying all the available schemes the user can switch to as shown below:
Action
Click the search box labelled 1 and type to search a scheme by name.
Click the drop-down menu labelled 2 to select an option to search for scheme records based on plan type.
Click the filter button labelled 3 to filter records based on search name or plan type.
Click the drop-down menu labelled 4 to select and set a scheme from the list as the working Scheme.